Georeference & Map View
How Nira handles real-world coordinates, why WGS84 vs. projected CRS matters, and how to fix the "blank box on the map" problem — written for surveyors, drone operators, and GIS users uploading georeferenced data.
Written By Nira.app
Last updated 2 days ago
Prerequisites
An asset with georeferenced coordinates embedded by your processing software (Metashape, RealityCapture, DJI Terra, Pix4D, Cyclone REGISTER 360, etc.), or the ability to assign a location manually.
Familiarity with your capture's coordinate reference system (CRS). If you don't know it, see Which CRS Should I Use? below.
Plan tier: Georeferencing and Map View are available on Individual, Professional, and Enterprise plans.
What "Georeferenced" Means in Nira
A georeferenced asset carries real-world coordinates — every point, vertex, or pixel knows where it is on Earth. When Nira detects these coordinates on upload, it unlocks:
Map View — your asset plotted on a satellite basemap alongside other assets at the same site
WGS84 coordinates in callouts and PDF reports — defect locations export as latitude/longitude
Slope and elevation measurements — only work when Nira knows which way is up
Interactive compass — shows true north relative to your viewing angle
Orthomosaic overlay — 2D top-down maps line up with the 3D model
If your asset is not georeferenced, Nira still renders it fine — you just lose these features. You can also assign a location manually after upload.
WGS84 vs. Projected CRS — The #1 Confusion
This is the single biggest source of georeferencing support tickets. Read this section before exporting.
⚠️ Rule of thumb: Process and export your asset in a projected CRS (UTM, state plane, OSGB36, etc.). Nira will automatically display coordinates in both the projected CRS and WGS84 lat/lon. Exporting directly in WGS84 degrees can cause scale distortion and the "model appears as a blank box on the map" bug.
Quick EPSG Reference
If you're unsure which UTM zone applies to your site, most processing tools will suggest one automatically based on your GPS metadata. When in doubt, pick the UTM zone that contains your capture area.
Enabling Map View
Map View shows all of your georeferenced assets on a satellite basemap.
From the Nira dashboard, click the Map tab in the top navigation.
Assets with valid georeferencing appear as pins at their real-world location.
Click a pin to open a preview and jump into the 3D viewer.
Use the basemap dropdown (top-right of the map) to switch between satellite, street, and terrain views.
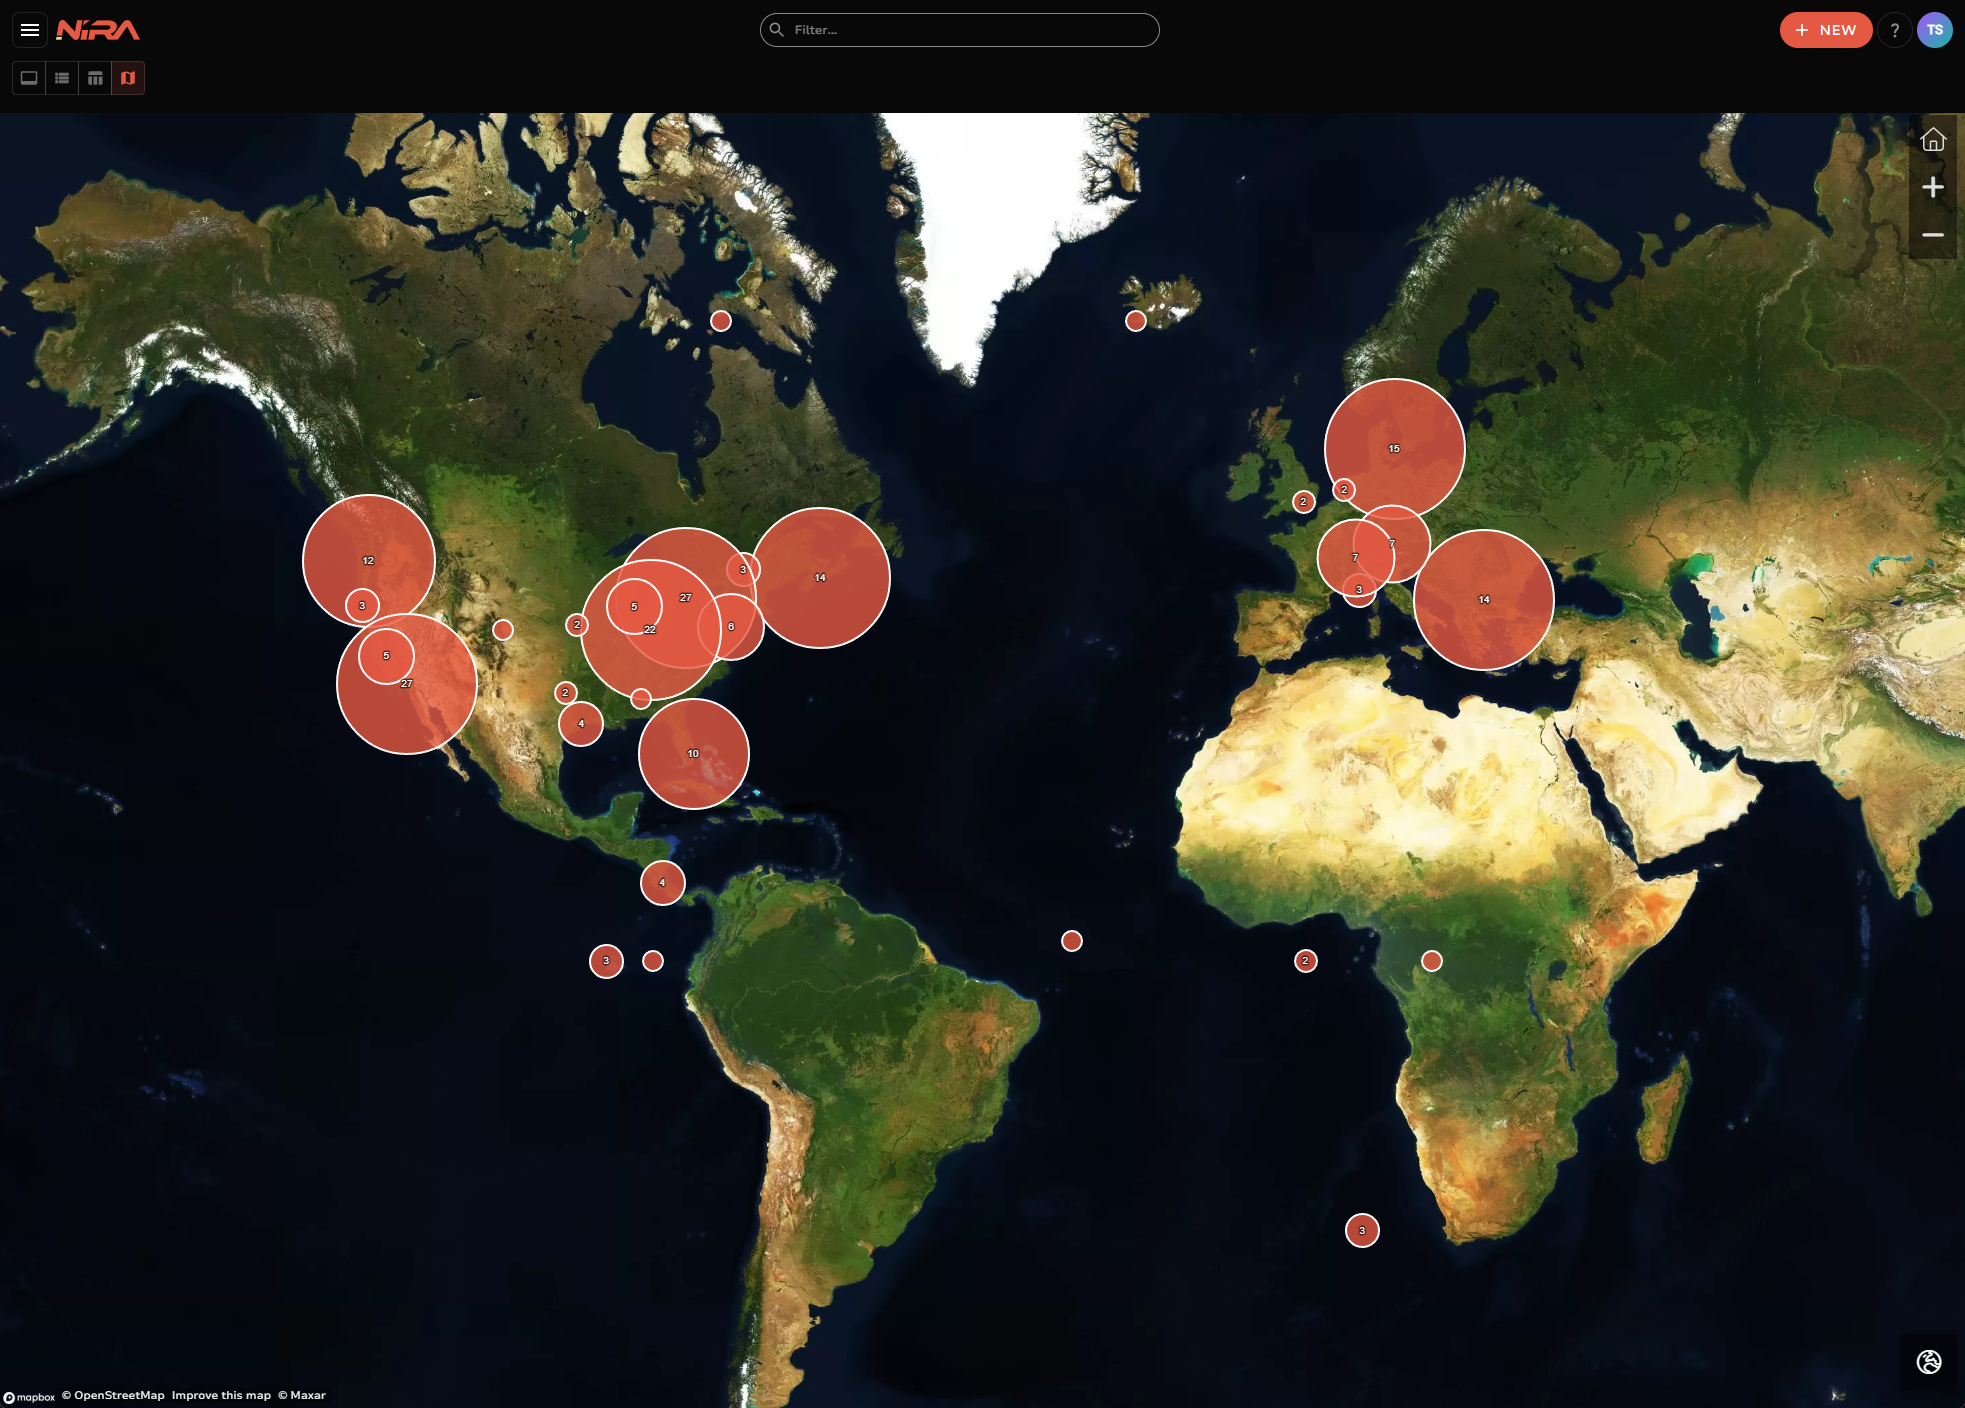
💡 Tip: Map View is plan-gated. Individual/Professional/Enterprise plans see it in the top nav. Legacy Core/Business plans do not.
Showing and Hiding On-Screen Coordinates
When you click the surface of a georeferenced asset, Nira displays the clicked coordinates on screen.
Open the asset in the 3D viewer.
Click anywhere on the surface — coordinates appear near the cursor.
Toggle between latitude/longitude and Cartesian (projected) using the coordinate display button.
Click the copy icon to copy the current coordinate to your clipboard.
To hide coordinates entirely:
Open the Share... dialog.
Uncheck Show Click Coordinates.
Optionally set coordinates to fade away after a few seconds instead of staying pinned.
ℹ️ Note: Even with "Show Click Coordinates" disabled, coordinates still appear in callouts designated as Defects, in PDF reports, and in Map View. To fully suppress geographic coordinates, re-export your model using local coordinates in your processing software.
Assigning a Location Manually
If your asset was processed without georeferencing, you can assign a location after upload. This won't unlock measurement features that depend on true scale (slope, elevation), but it will place the asset on Map View.
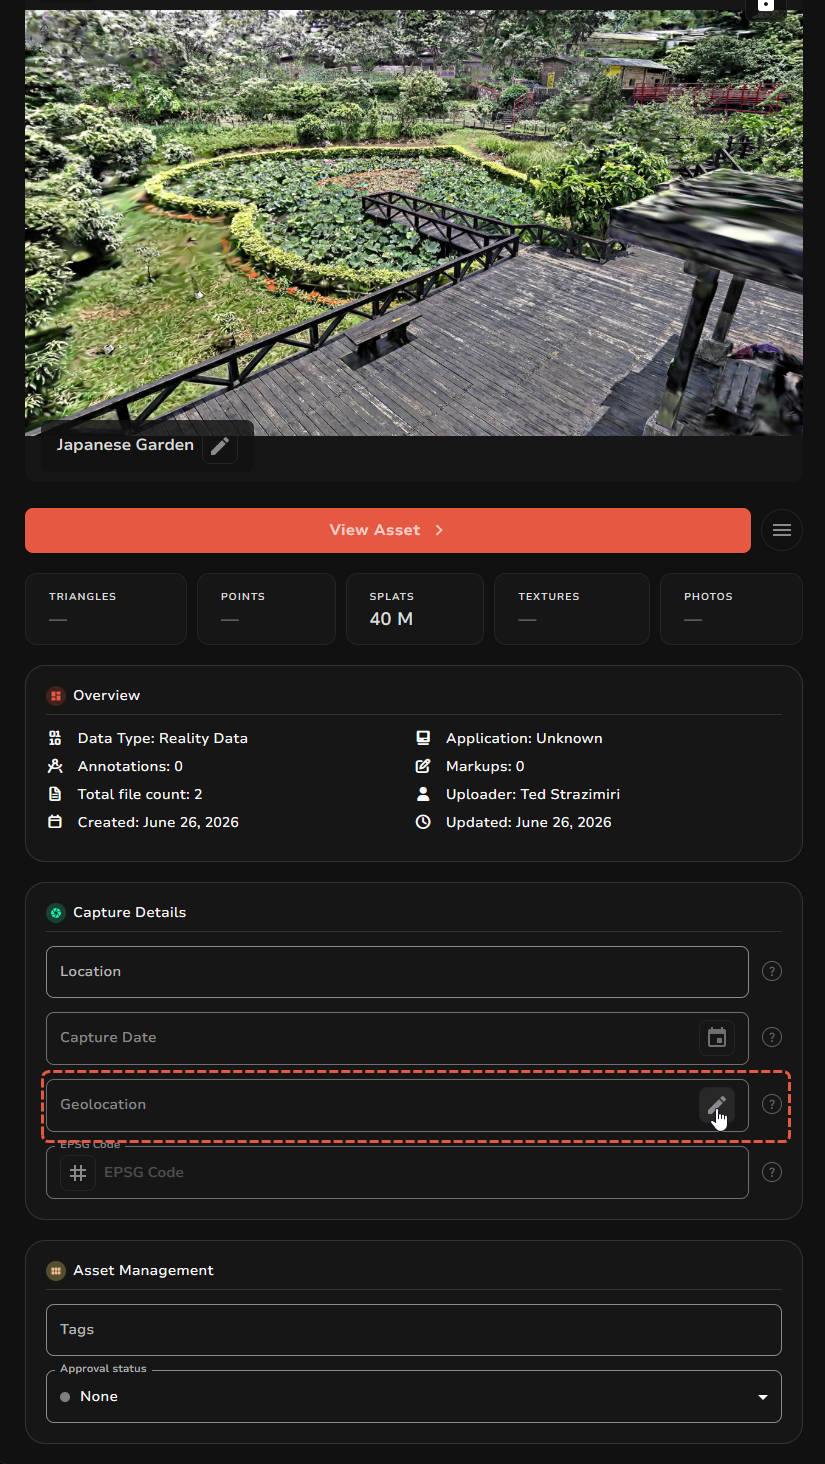
Open the asset preview page.
Click Edit Icon on Geolocation section.
Enter location coordinates (Latitude, Longitude, Height)
Click Save. The asset now appears in Map View at the assigned location.
Orthomosaics and Georeferencing
Orthomosaics (GeoTIFF .tif/.tiff) inherit the CRS embedded in the file. When georeferenced, they overlay directly on the 3D asset and on Map View's basemap.
⚠️ GeoTIFF must include an alpha channel. Without it, your orthomosaic will render with black or white borders, or display as a solid blank rectangle even when correctly placed on the map. Re-export with "include alpha channel" enabled in your processing software (Metashape, DJI Terra, Pix4D all have this option).
See Orthomosaic Troubleshooting for more.
Troubleshooting
Problem: Asset uploads successfully but appears as a blank box or empty white rectangle in Map View.
Cause: Almost always a CRS mismatch — typically the asset was exported in WGS84 degrees rather than a projected CRS, or the orthomosaic is missing an alpha channel.
Fix: Re-export from your processing software in a projected CRS (UTM zone covering your site). For orthomosaics, enable "alpha channel" on export. Re-upload the asset.
Problem: Asset pins appear in the wrong location on the map (e.g., off by hundreds of meters or on a different continent).
Cause: CRS is declared incorrectly in the source file — common when a tool defaults to a local CRS but tags it as something else.
Fix: Open the file in your processing software and verify the CRS setting matches the capture location. If using Metashape, check Reference Settings > Coordinate System. If unsure, re-process with an explicit UTM zone.
Problem: "Both of them show the incorrect location on the map" — two assets of the same site appear in different places.
Cause: The two assets were processed with different CRS settings, or one has local coordinates while the other has global.
Fix: Re-process both assets using the same projected CRS. They should then align in Map View and 3D space.
Problem: Slope and elevation measurements are unavailable or show nonsense values.
Cause: The asset is not truly georeferenced — it may have been assigned a location manually (which doesn't provide scale) or processed with local coordinates.
Fix: Re-process the asset with georeferenced output in a projected CRS. Measurement tools require a real-world scale reference to compute slope and elevation accurately.
Problem: Ortho uploads in WGS84 "plots in the correct location, but just displays as a blank box."
Cause: Known issue — WGS84 geographic CRS combined with missing alpha channel on GeoTIFF.
Fix: Re-export the ortho in a projected CRS (UTM) and ensure alpha channel is enabled.
Problem: Map View tab is missing from the top nav.
Cause: You're on a legacy Core or Business plan that doesn't include Map View.
Fix: Upgrade to Individual, Professional, or Enterprise. See Plans & Feature Comparison.
Which CRS Should I Use?
A decision tree for the most common capture scenarios:
Drone photogrammetry (DJI, Skydio, etc.) with GPS metadata → UTM zone covering your site. Your software will usually auto-detect this.
Terrestrial laser scan (Leica, Faro, RIEGL) → The CRS set in your registration software (Cyclone REGISTER 360, Faro Scene). If exporting to E57, keep the registered CRS.
Object capture without GPS (indoor, close-range) → Skip georeferencing; use local coordinates. Assign a Map View location manually if needed for organization.
Construction site revisited over time → Lock a single projected CRS across all captures so versions align in Compare and Map View.
Multi-site project spanning UTM zones → Pick the zone containing the majority of sites, or use a regional projected CRS like EPSG:3035 (Europe) or EPSG:3857 (web mercator — less accurate for measurements).
Technical Notes
Supported coordinate systems: Any CRS your processing software can embed in LAS/LAZ, E57, OBJ sidecar, or GeoTIFF metadata. Nira reads the embedded CRS and re-projects to WGS84 for display.
What's NOT supported: ECEF as a display coordinate system (works as input but converts), non-Cartesian custom projections, assets with mixed CRS across files.
Coordinate precision: Nira stores and displays coordinates at the precision provided by the source file. Sub-centimeter precision is preserved for LAS/LAZ/E57.
Callout export: Defect-type callouts export their clicked coordinates as WGS84 lat/lon in PDF reports. Bookmark and annotation callouts do not include geographic coordinates by design.
Local vs. global: If you need to hide all geographic information (confidential sites), export from your processing software in local coordinates before upload.
Related Articles
Georeferenced Upload Troubleshooting
Orthomosaic Troubleshooting
Locations