How to generate Inspection Reports
Written By Nira.app
Last updated About 4 hours ago
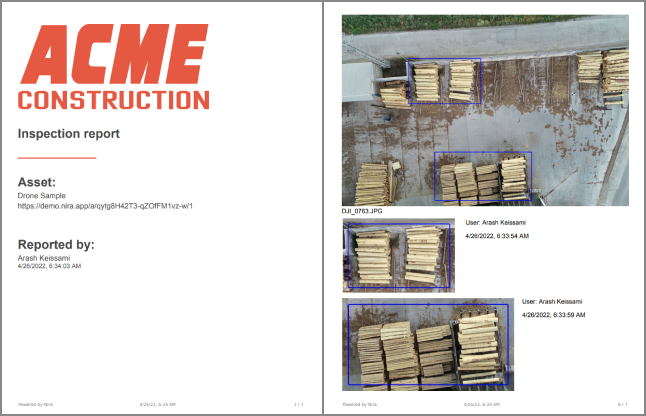
Nira allows you to easily highlight areas of interest in your uploaded photos and generate an inspection report PDF file like this with just a few clicks. To generate an inspection report, you'll first need to create some callouts on the asset's photos. Read below to learn how. Also note, there are more inspection report features are coming soon, including:
- Rich text commenting features
- Better integration between photo callouts and the 3D model
1. First, upload an asset to Nira, along with photos and camera information. (Instructions for Agisoft Metashape) (Instructions for Reality Capture)
2. Open the asset in Nira and press the "View Photos" button:

3. Click on any photo in the thumbnail strip. This will open a larger view of the photo.
4. Zoom and pan within the photo viewer to find an area of interest. On desktop platforms, Zoom is Wheel or RMB and Pan is LMB or MMB. On mobile platforms, Zoom is pinch and pan is single finger drag.
The photo viewer starts with Pan active. You can also zoom by double-clicking or double-tapping; separate zoom-in and zoom-out toolbar buttons are no longer shown.
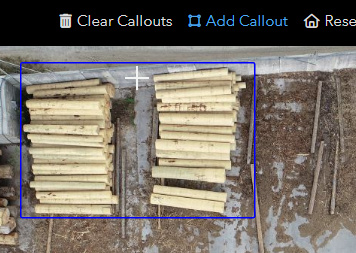
4. Click the Create Annotation button then drag a rectangle around the area of interest. You can repeat this process on this photo and any other photos on the asset.
5. Once you're done, you can close the photo viewer using the button in the upper-right:

Now that you have some callouts on your photos, you're ready to generate the report:
You can also generate and download PDF reports from the asset preview page: open the Files tab and use its Download dropdown. This lets you generate a report without opening the asset in the viewer. Downloads require a Growth or higher plan.
1. Enter edit mode:
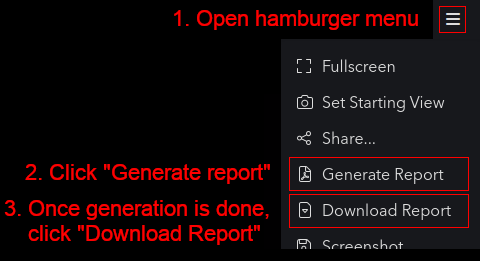
2. Open the hamburger menu, click "Generate Report"
3. Once generation is complete, click "Download Report"